|
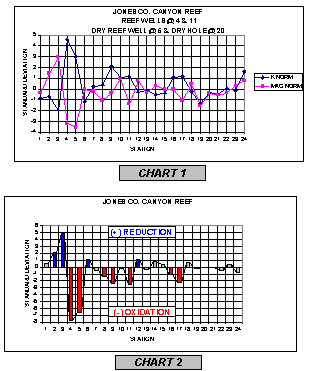
Chart 1 shows the normalized 40K and Mag concentrations along the profile while Chart 2 shows the Oxidized (red, high 40K with low Mag) and Reduced (blue, low 40K with high Mag) soil environments (Chart 2 is a product of Chart 1).
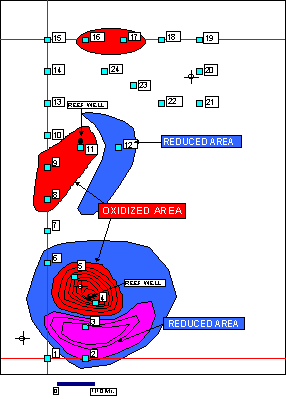
Note the extreme oxidizing and reducing environments seen on and around the southern reef (points 3-5). Standard deviations of +5 to -8 are extremely strong. A dry hole was first drilled on the north side of the reef (point 5), that encountered tight rock. Then the producer was drilled on the south side of the reef. Chart 2 shows the producer at point 4 is in the best part of the anomaly with the dry hole being 1 standard deviation less than the producer does. Although both points are anomalous, point 4 is the better of the two. Also note the reducing environment seen at point 3 is five standard deviations while the north side of the reef has only a one standard deviation anomaly. The south part of the reef is much more anomalous or seepy than the north part.
The anomaly seen on the northern reef with standard deviations of +1 to -2 are considered a good anomaly. Note how this anomaly extends southwest across the section line at points 8 & 9. If the seismic doesn't show the reef extending in this direction, another zone may be productive lying on the flank of the reef. The oxidized area at points 16, & 17 may be indicative of a productive area to the north; however, the lack of reducing environment is seen associated with the oxidized area.
The dry hole at point 20 has no anomaly associated with it at all. This is a normal dry hole profile.
The Meers Microseep Survey correctly identified both of the Canyon Reefs as anomalous as well as identified another potential location to the southwest of the northern most reef. The dry hole at point 20 showed no anomalous condition while the dry hole on the north side of the productive southern reef was drilled on the least anomalous side of the reef anomaly.
|
|